![]()


Great photo booth photos do not happen by accident. Behind every crisp, glowing, share-worthy shot is a lighting setup that was thought through before a single guest stepped in front of the camera. Whether you are hosting a wedding reception in Scottsdale, a corporate brand activation in Phoenix, or a birthday party that needs to feel a little extra, the right photo booth lighting setup can be the difference between blurry, washed-out memories and stunning prints people actually want to keep. At Epic Events Booth, we have dialed in our lighting approach across hundreds of events, and in this guide we are sharing exactly what works.
Why Proper Photo Booth Lighting Matters More Than You Think
Ask any photographer and they will tell you the same thing: light is everything. That truth applies just as much to photo booth photography as it does to a studio portrait session. Proper photo booth lighting is what flatters your guests, keeps skin tones accurate, and ensures the background pops the way it should. Without it, even the most expensive photo booth hardware will produce photos that look flat, grainy, or just plain unflattering.
Good photo booth lighting also affects guest experience directly. When people step into a well-lit booth setup and see an instant preview that makes them look great, they want to take more photos. They share more. They talk about it. According to BizBash, interactive photo experiences are consistently among the top engagement drivers at live events, and the quality of the photos themselves plays a big role in whether guests actually use the sharing features. Bottom line: nailing your lighting setup is not optional if you want professional-looking results.
Understanding Different Photo Booth Lighting Options
Not all light sources are created equal, and understanding your options before you set up is essential. Here is a quick rundown of the most common photobooth lighting types and where each one shines (pun intended).
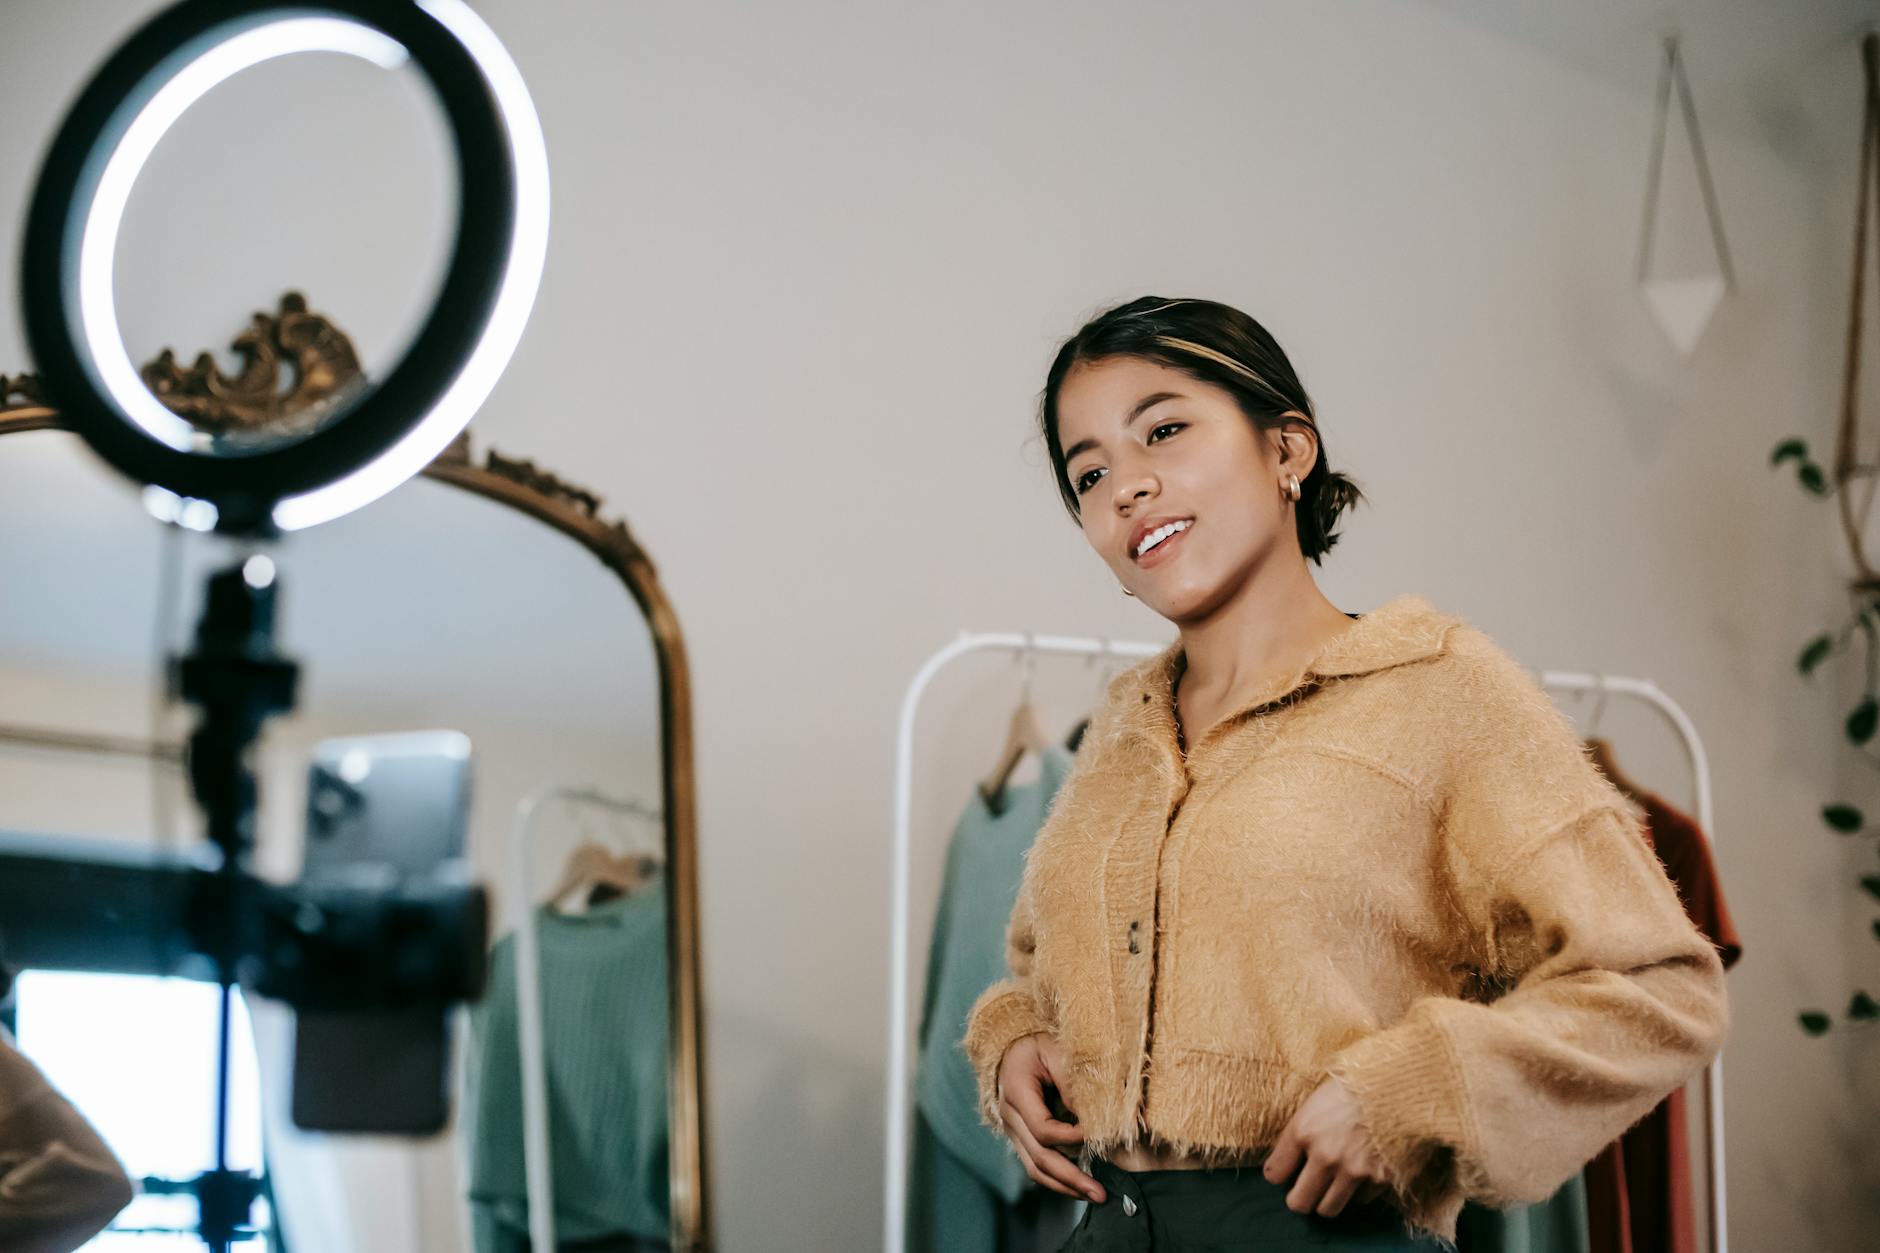
- Ring lights: Ring lights produce a soft, even glow that wraps around the subject and minimizes harsh shadows. They are popular for close-up shots and portrait-style photo booth setups. Many iPad photo booth stands come with a built-in ring light for exactly this reason. The circular catchlight they create in the eyes also gives photos a polished, professional look.
- Softbox lights: Softboxes diffuse light over a larger surface area, which creates soft, flattering illumination with gradual shadow transitions. They are a staple in photography studios and work extremely well in larger photo booth setups where multiple people are posing together.
- LED panel lights: LED panels are energy-efficient, portable, and adjustable. Many high-end photo booth operators use bi-color LED panels because they let you dial in color temperature to match the venue’s ambient lighting, which keeps skin tones looking natural.
- Photobooth flash: A well-timed photobooth flash can freeze motion and produce crisp, bright images even in dim venues. The trade-off is that flash can feel harsh if it is not diffused properly. A diffuser cap or softbox attachment goes a long way here.
- Halo photo booth lighting: Products like the Simple Booth HALO style setups use a large circular LED ring as the primary light source, which is mounted directly on the unit. This gives guests an immediately flattering, studio-quality look with minimal setup effort.
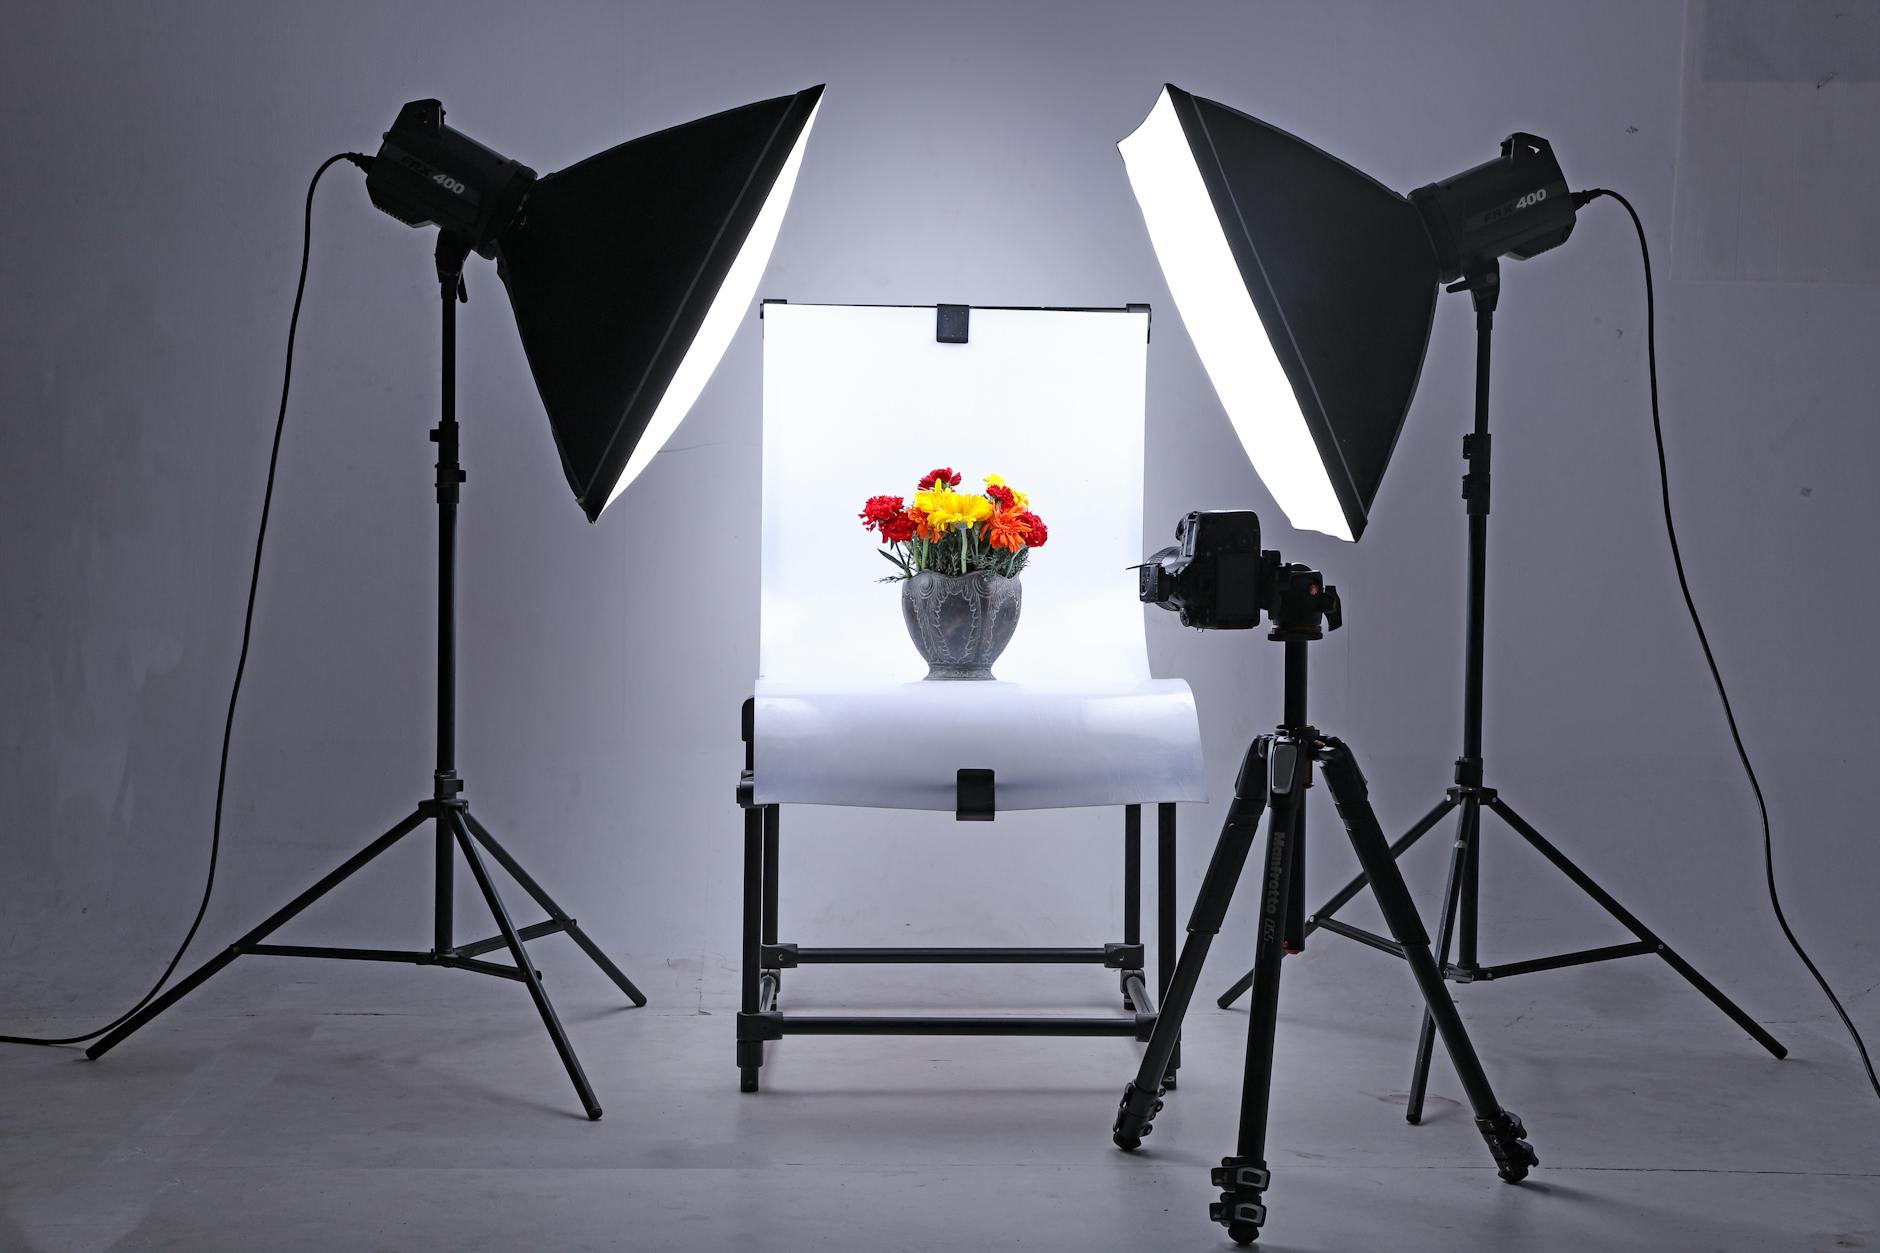
How to Light a Photo Booth Using the 3-Point System
One of the most searched questions we hear is: What is the 3 lighting rule? The three-point lighting setup is a classic technique used in photography and film. It uses three light sources placed at specific positions relative to the subject to create depth, dimension, and flattering shadows.
- Key light: This is your main, brightest light source. Place it at roughly a 45-degree angle to one side of the subject and slightly above eye level. This is the light doing the heavy lifting in terms of illuminating faces.
- Fill light: The fill light sits on the opposite side from the key light and is softer, usually about half the intensity. Its job is to reduce the shadows created by the key light so the image does not look too dramatic or one-sided.
- Back light (or hair light): Placed behind the subject and aimed toward the back of their head and shoulders, this light separates the subject from the background and adds a three-dimensional quality to the photo.
When you set up photo booth lighting using three-point technique, the results look significantly more polished than a single flat light ever could. This approach works especially well for open-air wedding photo and video booth setups where guests are posing in a more open space rather than an enclosed box.
Choosing the Right Equipment for Your Photo Booth Setup
Choosing the right photo booth equipment goes hand in hand with selecting the right lighting. The camera, the stand, and the lighting all need to work together as a system. Here are the key hardware considerations.
Camera and stand pairing: Many modern photo booth setups use a DSLR or mirrorless camera mounted on a dedicated photo booth stand, or an iPad photo booth stand for sleeker, more portable setups. The stand height matters because it affects the angle of both the camera and the lights. Ideally, your key light should sit slightly above the camera and angle downward at roughly 45 degrees, which is universally flattering.
Light modifiers: Bare bulbs and bare LED panels produce harsh light. Always use modifiers: softboxes, umbrella diffusers, or at minimum a bounce card. These tools spread and soften light so it wraps around faces rather than blasting them head-on.
Color temperature control: Mixing warm tungsten light from a venue with cool daylight-balanced booth lights will make skin tones look inconsistent and strange. Use adjustable bi-color LED lights and set them to match the room’s dominant light source, usually around 3200K for warm indoor venues or 5500K for daylight-balanced spaces.
If you are curious how equipment choices affect the overall photo booth experience, our post on renting vs. buying a photo booth for your business in Queen Creek covers how to think through those decisions practically.
How to Read and Work With Your Venue
Even a perfect photo booth lighting setup can struggle if you ignore the venue environment. Before your event, take a few minutes to evaluate the space. Here is what to look for.
- Ambient light levels: Bright ballrooms with chandeliers are very different from dark, moody rooftop bars. In bright venues, your booth lighting needs to be strong enough to compete. In dark venues, you have more control but you need to make sure guests are not squinting into harsh lights.
- Wall and ceiling colors: Light bounces. White or cream-colored walls can act as natural fill light, which is helpful. Dark or highly saturated walls can cast unwanted color onto your subjects.
- Window light: Natural light from windows can be gorgeous during a daytime event but it shifts throughout the day and creates inconsistency. If your booth is near windows, use blackout curtains or angle the setup so windows are behind the camera, not behind the subjects.
- Available power sources: Know where your power outlets are and plan your cable runs before guests arrive. A tripped breaker mid-event is not a great look.
According to The Knot, venue walkthrough and preparation are among the most important steps couples overlook when planning photo and video experiences at weddings. The same principle applies to any event.
Tips to Make Your Photo Booth Pictures Look Their Best
People often ask: How do I make my photo booth pictures look good? Beyond the technical lighting setup, there are a few practical things that make a noticeable difference in the final images.
- Position guests correctly: Encourage guests to stand close together rather than spread out. Tighter groupings keep everyone in the same focal plane and ensure your lighting covers everyone evenly.
- Use a clean, intentional backdrop: A busy or wrinkled backdrop competes with your subjects. A smooth, well-lit backdrop with the right color contrast makes everyone pop. Our setups at Epic Events Booth always include customizable backdrops designed to pair with the lighting for a cohesive look.
- Keep settings consistent: If you are using photo booth software to manage the camera, lock your exposure, ISO, and white balance settings so every shot looks uniform. Inconsistent settings are a common cause of photos that look great in one frame and terrible in the next.
- Test before the event starts: Take at least a dozen test shots at different positions and with different numbers of people in the frame before guests arrive. Check for hot spots, shadows under the chin (a sign your key light is too high), and color casts from the venue lighting.
- Use a glam filter setting thoughtfully: Our Glam Booth option uses studio-quality lighting and software processing to give photos a high-fashion, airbrushed look. When used with a properly set up lighting rig, the results are genuinely stunning. But glam filters on top of bad lighting just look like bad lighting with a filter on top.
If you want to avoid the most common pitfalls before your next event, take a look at our post on photo booth mistakes Tempe event planners should avoid. Many of them come back to preparation and lighting choices.
Keeping a Cohesive Lighting and Booth Setup All Night Long
One thing that separates a professional photo booth setup from a DIY attempt is consistency. Great photobooth lighting does not just look good in the first hour. It looks just as good when the dance floor is packed at 10 PM and the venue lights have shifted.
A few ways to maintain a cohesive photo booth lighting setup throughout the event:
- Tape down your light stand positions so they do not get bumped or shifted by guests.
- Assign a dedicated attendant to monitor the setup and check photo quality periodically throughout the event. At Epic Events Booth, every rental includes an on-site attendant for exactly this reason.
- Use lights with physical locking dials or digital settings that cannot be accidentally adjusted.
- Protect your lights from direct contact with curious guests, especially at parties with younger attendees.
Consistent lighting also means your photo strip or print layout will look uniform from the first guest to the last, which matters a lot when photos are printed as keepsakes or shared on social media instantly. That kind of polish is what makes guests remember the experience, and it is what makes event planners book the same photo booth company again next time. For large events like corporate activations, check out how a photo booth rental for corporate parties can be customized to maintain brand consistency from start to finish.
Ready to bring professional photo booth lighting and a flawless guest experience to your next event in Arizona? Our team at Epic Events Booth handles all the setup, equipment, and on-site support so you do not have to worry about a thing. Reach out and contact us today for a free quote and let us help you create photos your guests will actually be proud to share.