![]()


The best photo booth shooting tips for events come down to a handful of practical decisions: controlling your backdrop, dialing in your lighting, positioning your booth in the right spot, and giving guests a little guidance before they step in front of the camera. Get those four things right and the photos almost take care of themselves. This post walks through 10 specific, field-tested strategies you can put to work at your next event.
1. Nail Your Backdrop Setup Before Guests Arrive
Your backdrop is the first thing people see in every single photo, so it deserves real attention before the doors open. A loose, wrinkled, or oversized backdrop kills the shot before the camera even clicks. One of the most effective photo booth backdrop tips is to trim your backdrop narrower than you might expect. Working with a 9-foot wide vinyl backdrop? Pull it in to about 6 feet of usable width. That tighter frame naturally pulls guests closer together, fills the shot, and creates a more cohesive look across every photo you take.
When choosing materials, smooth matte vinyl and fabric both work well, but fabric tends to resist glare better when you’re shooting with flash. If you want a more polished, styled look, check out our guide to photo booth backdrop styling for events for deeper advice on colors, textures, and themed options. For weddings especially, choosing a photo booth backdrop for your wedding is one of the highest-impact decisions you’ll make in the planning process.
Avoid busy, distracting patterns unless they are intentionally part of the theme. Solid colors, subtle textures, and branded elements all photograph cleanly and give guests a polished finished product they actually want to share.
2. Choose the Right Photo Booth Lighting Setup
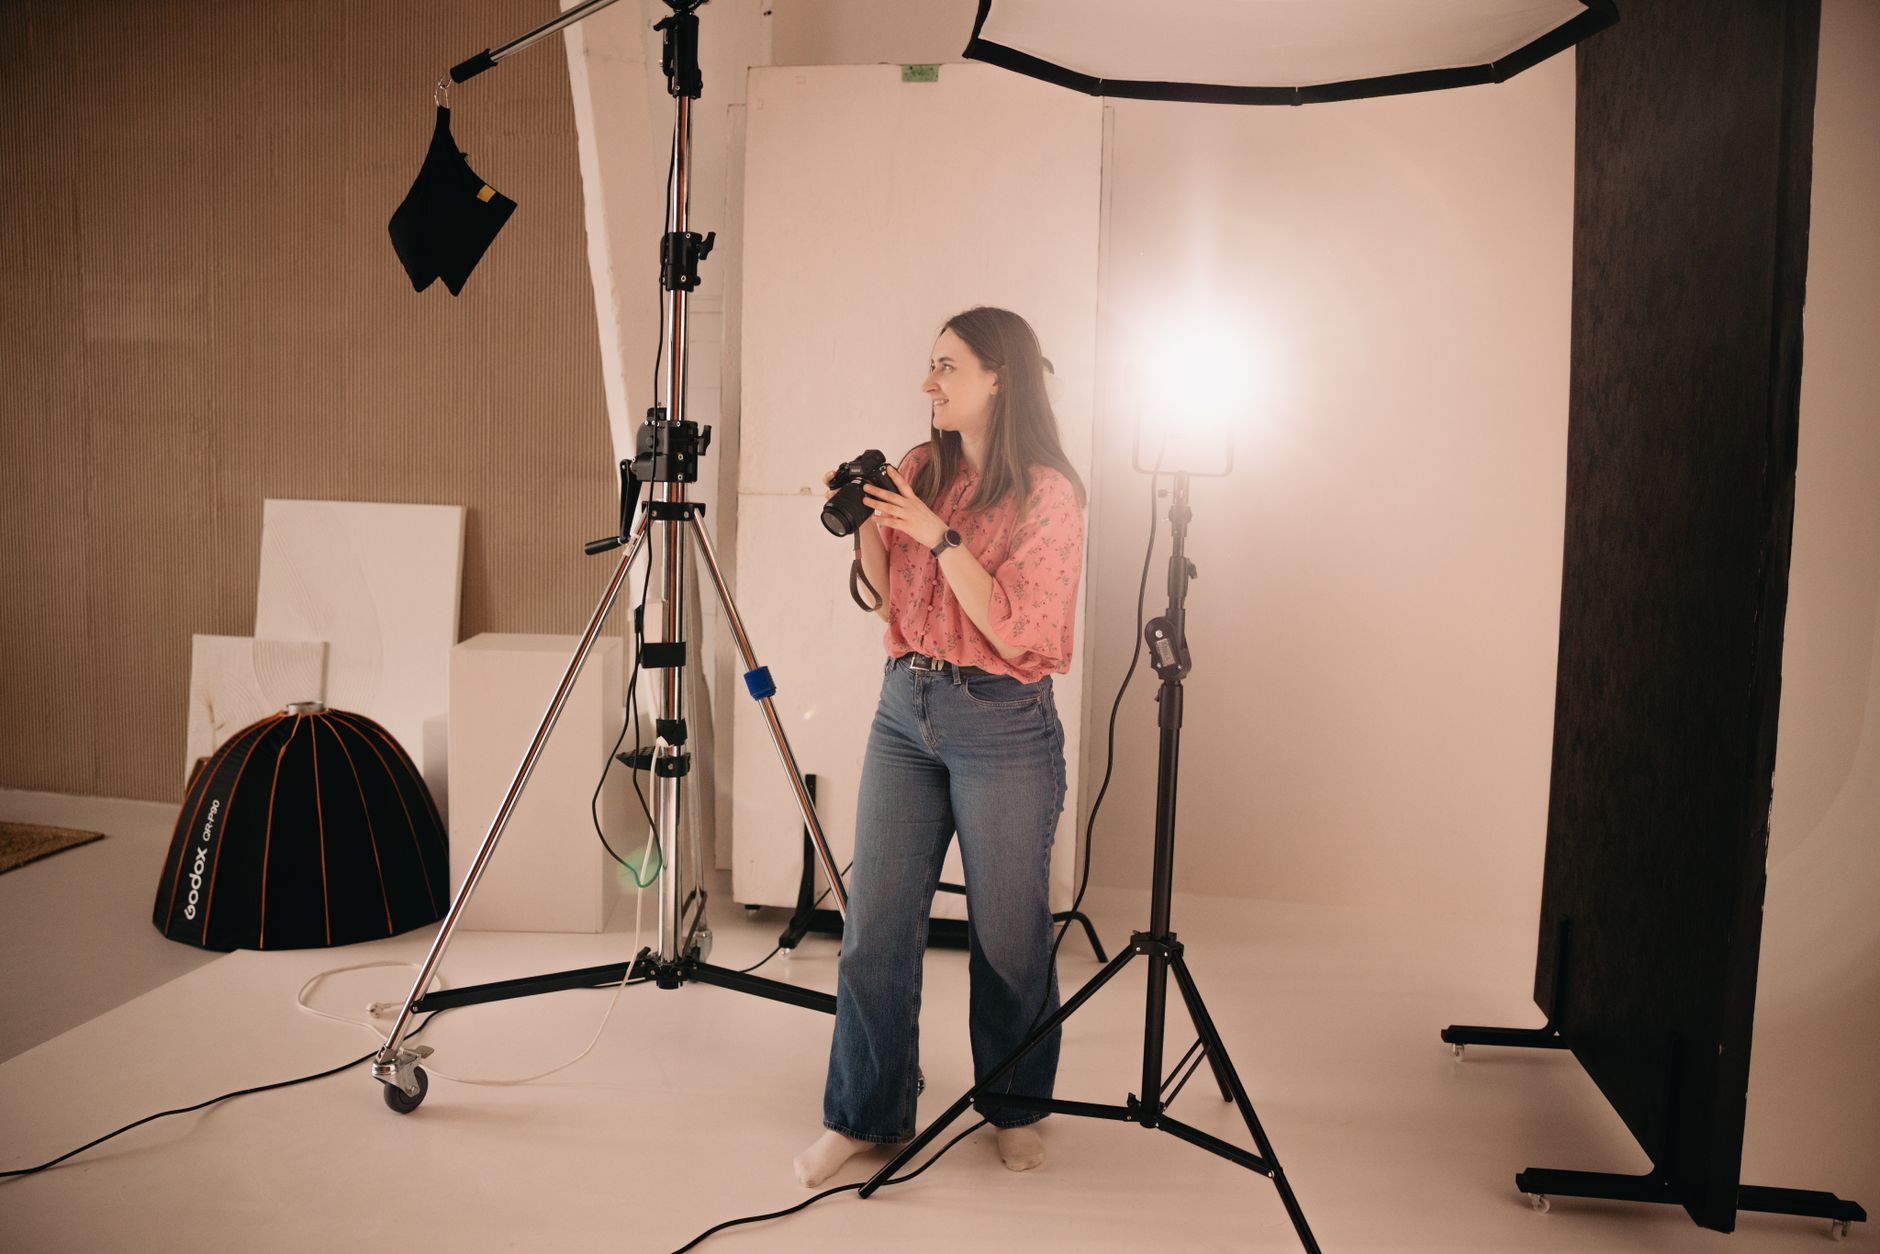
Good lighting is the single biggest variable separating professional-looking photo booth photos from amateur ones. Best photo booth lighting setups almost always involve a ring light or a softbox positioned directly in front of the subject, slightly above eye level. This placement produces even, flattering light that minimizes harsh shadows under the chin and around the eyes.
A ring light is especially popular in photo booth setups because it wraps light evenly around the subject and creates that distinctive catch-light in the eyes. For a more dramatic, editorial feel, a single large softbox placed slightly off-center can add dimension. When you’re shooting in a dark venue, adding a secondary fill light on the opposite side helps balance the exposure without overcomplicating the setup.
If your booth uses flash, make sure the flash power is matched to your ambient light conditions. A photobooth with flash that’s set too high will blow out skin tones and flatten faces. A flash that’s too low leaves muddy, underexposed results. Test your flash output at the start of every event and dial it back as the room fills up, since more people and warmer ambient light from dancing and decor will change your exposure baseline.
According to event industry resources like BizBash, lighting consistency is one of the top factors event planners look for when evaluating photo booth vendors, so investing time in getting your light right pays off in client satisfaction and repeat bookings.
3. Use a Tripod and Lock Your Camera Position
A tripod sounds obvious, but a surprising number of event photo booth setups skip this step and then wonder why photos come out inconsistent. Your camera should be locked down at a fixed height, angle, and distance for the entire event. That consistency is what gives a professional photo booth its polished, branded look, as every image has the same composition, the same amount of headroom, and the same relationship between subject and backdrop.
Set your tripod height so the camera lens sits at roughly chest or chin level for the average adult. Shooting slightly upward tends to be more flattering than shooting straight on or downward. Lock the head so there’s zero drift during a busy event, because even a small shift in camera angle over the course of four hours will leave you with a set of photos that feel disjointed when guests scroll back through them.
If you’re running an open-air photo booth setup at an event, consider using a weighted bag on the tripod center column to add stability. In high-traffic areas with a lot of movement and vibration, that extra weight prevents micro-vibrations from softening your shots.
4. Place the Booth in a High-Traffic Area
Booth placement is a strategic decision that directly affects how many people use it and how good the photos look. The photo booth location at an event should be visible from multiple entry points, close to the bar or food station (both are natural gathering points), and out of direct competition with the dance floor for noise and congestion.
Avoid tucking the booth into a corner where it becomes an afterthought. You want it positioned so guests naturally drift toward it between activities. A little rope or velvet stanchion framing can signal that the booth is a destination worth visiting, not just a piece of equipment sitting in a hallway.
High-traffic placement also matters for lighting. Natural light from windows or skylights can be a problem, especially during daytime events, because it competes with your controlled lighting setup and shifts in color temperature as the sun moves. When you scout the venue, note where windows are and plan your booth orientation to minimize direct sunlight hitting the backdrop or the subjects.
5. Dial In the Right Camera Settings for Indoor Events
Indoor event photography presents a consistent set of challenges: mixed ambient lighting, variable distances between subjects, and unpredictable background brightness. The best camera settings for photo booths at indoor events usually start with a fixed aperture between f/5.6 and f/8. That range keeps enough depth of field to make sure even a group of five or six people stays sharp, without requiring so much light that your flash has to work overtime.
Set your shutter speed to 1/125 or 1/160 to sync cleanly with flash and freeze any motion, because people move more than you expect when they’re laughing and holding props. ISO should stay between 100 and 400 in most controlled photo booth environments. Going higher introduces noise, and since you’re controlling the light with flash or LED panels, there’s rarely a reason to push ISO above 800.
White balance is worth setting manually. Auto white balance will shift between shots as the ambient light changes and as different colored decor or clothing reflects into the scene. Lock it to a kelvin value that matches your primary light source, typically around 5500K for a standard LED ring light, and your photos will have a consistent color tone from the first shot to the last.
For those looking to go deeper on photography lighting fundamentals, there are excellent free photography lighting courses available online through platforms like open educational resources that cover flash sync, color temperature, and exposure basics in accessible, practical formats.
6. Get Creative With Props and Guest Interaction
Props are more than just accessories. They are ice-breakers. The right props loosen people up, signal to guests that the booth is meant to be fun, and result in more expressive, memorable photos. Photo booth prop ideas for events can range from classic oversized glasses and feather boas to completely custom, event-specific pieces that tie into the theme.
For corporate events and brand activations, branded props like oversized logos, product replicas, or company-specific signage turn every photo into shareable marketing content. For weddings, personalized signs with the couple’s names or wedding date add a sentimental touch guests genuinely appreciate. Platforms like The Knot consistently highlight creative, personalized photo booth experiences as one of the most-talked-about elements of modern weddings.
Keep your prop table well-organized and replenished throughout the event. A messy, depleted prop table tells guests the booth is an afterthought. A clean, curated display tells them it’s a premium experience worth participating in. Assign a booth attendant to straighten props between group sessions, which also gives you the opportunity to gently coach guests on posing and positioning.
If you’re working on a DIY photo booth setup, budget a meaningful portion of your planning time to prop selection and styling. The props often matter more to guest engagement than any technical setting on the camera.
7. Prioritize Important Guests Early in the Event
One common mistake at events is waiting for important guests to naturally find their way to the photo booth. At weddings, the couple and their wedding party should use the booth early, ideally during cocktail hour before the energy starts to wind down later in the evening. At corporate events, get executives, award winners, or honorees in front of the camera while they’re still engaged and before they start heading for the exit.
Early use by key guests also creates social proof on-site. When other attendees see the guest of honor holding props and laughing, curiosity naturally builds and the line forms on its own. It creates momentum that carries through the rest of the event.
Coordinate with your event host or planner in advance so they can steer VIPs toward the booth at the right moment. A little proactive scheduling goes a long way toward capturing the photos that matter most, while still leaving plenty of time for all other guests to enjoy the experience.
8. Make Sure Group Photos Can Fit Comfortably in the Frame
Group photo booth shots are some of the most popular and most shared, but they require intentional setup. A backdrop that’s too narrow or a camera that’s positioned too close will cut people off at the edges, which looks sloppy and frustrates guests. For group photo booth setup, plan for a minimum of 8 feet of backdrop width if you expect groups of six or more.
Your camera distance matters just as much as backdrop width. Step your camera back far enough that a wide group still has comfortable headroom above and space at the sides. A wider angle lens, something in the 24mm to 35mm range on a full-frame body, helps capture larger groups without forcing people to scrunch uncomfortably.
If your venue or setup has space limitations, consider a vertical photo strip layout that captures two or three guests per panel. That format naturally organizes larger groups across multiple frames and still produces a cohesive, shareable result. For video booth setups, video booth customization options like overlays and branded backgrounds can also help frame groups beautifully regardless of how many guests step into the shot.
9. Optimize Photos for Instant Social Media Sharing
Guests expect to share their photos within minutes of taking them. Social media-ready photo booth images should be square or vertical in format (both perform better on mobile platforms), and they should be exported at a resolution that looks sharp on a smartphone screen without being so large it slows down the sharing process.
Adding a custom overlay, a watermark, or a branded frame around each image ties the photo to the event and turns every share into organic exposure. Keep your overlay design clean and minimal so it enhances the photo rather than distracting from it. According to WeddingWire, social sharing is one of the top reasons couples and event hosts invest in photo booths, so making that process as frictionless as possible is a core part of the service.
At luxury photo booth rental in az, we build instant social sharing into every experience we offer. Guests can text, email, or scan a QR code to grab their photo seconds after it’s taken, no waiting and no friction.
If you’re exploring what kinds of booth experiences offer the best social sharing features, our breakdown of photo booth types for events walks through the strengths of each format in plain terms.
10. Verify Camera Date, Time, and Settings at the Start of Every Event
This one sounds minor until you’re reviewing 400 photos from last Saturday’s wedding and every single timestamp is wrong. Checking your camera’s date and time before every event is a basic hygiene step that protects your ability to organize, sort, and deliver images accurately. If you’re running two cameras or a hybrid setup with a video booth alongside a photo booth, syncing the clocks on both devices is critical for keeping a clean timeline of the event.
Beyond the clock, do a full pre-event camera settings check. Confirm your file format (RAW plus JPEG is a safe standard for photo booth event shooting), your storage card has been formatted and has plenty of space, your battery or power supply is topped off, and your backup trigger or remote is working. Running a five-minute test shoot with a colleague or venue staff member before guests arrive surfaces any issues before they become problems in front of a crowd.
For more location-specific photo booth shooting advice, our post on photo booth event photography tips covers additional setup considerations worth reviewing before your next booking.
Ready to Elevate Your Event With a Professional Photo Booth?
Whether you’re planning a wedding, a corporate event, or a private party, putting these photo booth shooting tips into practice will make a noticeable difference in the quality of photos your guests walk away with. From tight backdrop setups and locked-down camera positions to optimized lighting and creative props, every detail adds up. If you want a social event photo booth rental that handles all of these details for you, the Epic Events Booth team is ready to help. We bring professional-grade equipment, experienced attendants, and fully customized experiences to every event we serve across Arizona. contact us today for a free quote on photo booth rental in Arizona and let’s start building something unforgettable together.
Frequently Asked Questions
What kind of camera settings are best for events inside?
For indoor photo booth setups, start with an aperture of f/5.6 to f/8, a shutter speed of 1/125 to 1/160 to sync with flash and freeze motion, and an ISO between 100 and 400. Set white balance manually to match your primary light source, typically around 5500K for LED lighting, so your color tones stay consistent from the first shot to the last.
What is the best lighting setup for a photo booth at an event?
A ring light or large softbox positioned slightly above eye level and directly in front of the subject produces the most flattering, even results. For darker venues, add a secondary fill light on the opposite side to reduce harsh shadows. If you’re using flash, test your flash power output at the start of the event and adjust as ambient light conditions change throughout the night.
How wide should a photo booth backdrop be for group shots?
For groups of six or more, plan for at least 8 feet of usable backdrop width. Pulling a wider backdrop in to about 6 feet works well for individuals and smaller groups, as it naturally brings people closer together in the frame. Pair the backdrop width with a camera position far enough back to capture comfortable headroom and side clearance for the entire group.
Where should a photo booth be placed at an event?
Place your photo booth near high-traffic gathering points like the bar, food station, or main entrance. Visibility from multiple entry points encourages more guest participation. Avoid placing it in a dark corner or directly competing with the dance floor. Also check for window placement during venue scouting, since direct natural light can interfere with your controlled lighting setup.
How do I make photo booth pictures ready to share on social media?
Export images in a square or vertical format for better mobile display. Keep resolution high enough to look sharp on a phone screen but compressed enough to share quickly. Add a clean, minimal branded overlay or event frame to each image. Offer guests instant delivery via text, email, or QR code scan so sharing happens in the moment while excitement is still high.